Share this page


Enhancing the Logon Page
You may want to provide site-specific information on the logon page of your PPM instance to help the users in your organization. This could include the following types of information (among many others):
-
Site administration contact information
-
System availability notices
-
Site-specific licensing and usage details
-
Client-specific advice
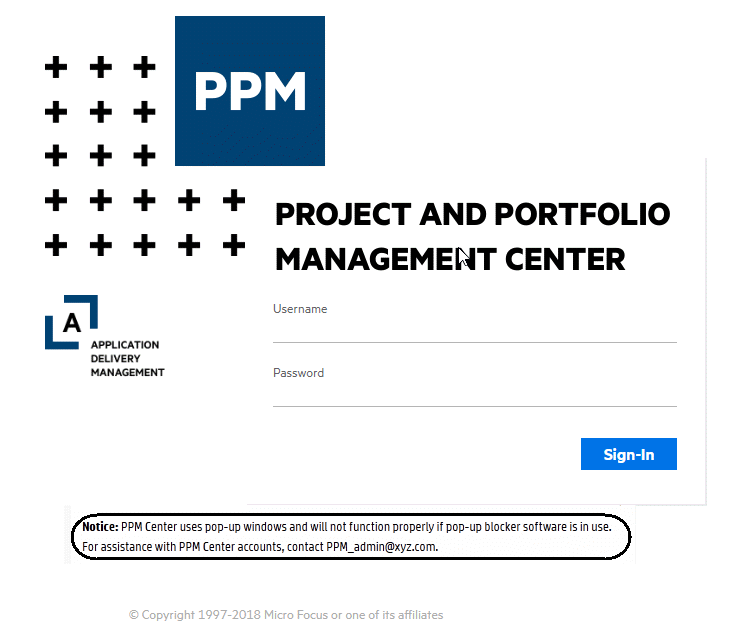
Figure 3-1. Custom logon page shows a page containing advisory information about client configuration. The page also provides contact details for the instance administrator.
To customize your logon page:
-
In a "working" location, create a new JSP file that contains the details that you want to display.
This uniquely named file ultimately resides in the
<PPM_Home>/server/<PPM_Server_Name>/deploy/itg.war/web/new/directory,where
<PPM_Home>represents the path where your PPM instance was installed. For example: xyzserver/E$/PPMServer.<PPM_Server_Name>represents the name assigned to your PPM Server during installation. For example: xyzProduction.(This corresponds to theKINTANA_SERVER_NAME server.confparameter value and does not necessarily reflect the host name of the server.)For example, you might create the following file named
PPM_Notice.jsp:<div class="comments"><div><b>Notice:</b> PPM Center uses pop-up windows and will not function properly if pop-up blocker software is in use.</div><div>For assistance with PPM Center accounts, contact PPM_admin@xyz.com.</div></div>You should also place a copy of this updated file in a safe location where it does not overwrite any previously updated version of the file.
-
Copy the
<PPM_Home>/server/<PPM_Server_Name>/deploy/itg.war/web/new/logon.jspfile to the "working" location.Remember that you should have a backup copy of this file stored in a safe location.
-
Edit the temporary version of the
logon.jspfile as follows:Immediately before the
</body>tag, insert text similar to the following, substituting the name of the file you created in step 1 forPPM_Notice.jsp.<jsp:include page="PPM_Notice.jsp"/> -
Save and close the file.
Remember that you should also have a backup copy of this modified file stored in a safe location.
-
Copy the
logon.jspfile and the file you created in step 1 to the<PPM_Home>/server/<PPM_Server_Name>/deploy/itg.war/web/new/directory on your PPM Server. - Run
kJSPComplier.shscript. -
Stop, then restart the PPM Server.
-
(Optional, although highly recommended) Verify the changes by logging off, then logging back onto PPM and viewing the results.