Share this page


Set up PPM Chatbot
This section provide details on how to set up PPM Chatbot.
Prerequisites
Make sure you have the following ready before setting up PPM Chatbot.
- Create a PPM user and only give it the "Configuration - Access to all Applications and their configuration, except User Administration" license and the "Rasa Webhook" access grant.
- Have a Windows or Linux server with the CPU supporting the AVX Instruction set.

Set up Microsoft Teams bot
Use App Studio to create Bot in Microsoft Teams. For details, see Create your app manifest and package.
Note down the following information:
- App ID: Generated automatically when you create a new bot.
- App password: Click Generate password in the App passwords section to generate a password.
Set up Rasa server
You can either manually set up the Rasa server or use the VM image provided by PPM to complete the setup.
-
Install the Rasa server. For details, see https://rasa.com/docs/rasa/user-guide/installation/.
Install Rasa version 1.7.2. It was certified by PPM. Make sure the CPU support the AVX Instruction set.
- Copy the
<PPM_Server>/bin/chat/microfocusfolder to a folder under<Rasa_Server>. -
Set the environment variable
PYTHONPATHto the folder where the "microfocus" is copied.For example, if you copy the "microfocus" folder to the "chatbot_lib" folder, set the variable to "chatbot_lib".
-
Create a new folder under
<Rasa_Server>, and run the following command in the new folder to create a Rasa project. This folder is your Rasa project folder.rasa init --no-prompt - Download the
endpoint.ymlandcredential.ymlfiles from the PPM Marketplace to your local machine. -
Copy the content of the downloaded
endpoint.ymlfile to theendpoint.ymlfile of your Rasa project, and update the following:- url:
http://<PPM_Server>:<PORT_Number>/itg/rest2/chat/webhook - username: The username of the user who has the access grant "Rasa Webhook".
- password: The password of the user who has the access grant "Rasa Webhook".
- url:
- Copy the content of the downloaded
credetails.ymlfile to thecredetails.ymlfile of your Rasa project, update app_id and app_password with your bot ID and password you noted down when setting up the Microsoft Teams bot. -
In the Rasa project folder, run the following command line to start the Rasa server:
rasa run --enable-api
Set up Rasa Server using VM image
PPM already has the Rasa server installed and Rasa project created in a VM. You can leverage the VM image to simplify the Rasa server setup procedures.
- Obtain the VM image from the PPM marketplace.
-
Start the VM using the following account.
Username: admin
Password: 1Qaz2wsx
- Edit the
endpoint.ymlandcredetails.ymlfiles, as described in step 6 and 7 in Manual setup. -
Go to the Rasa project folder and run the following command line to start the Rasa server:
rasa run --enable-api
For more information about configuring Rasa server, see:
- https://rasa.com/docs/rasa/user-guide/rasa-tutorial/
- https://rasa.com/docs/rasa/user-guide/command-line-interface/#start-a-server
- https://rasa.com/docs/rasa/user-guide/configuring-http-api/#configuring-http-api
Set up PPM
-
Set the following in the
server.conffile.-
com.kintana.core.server.RASA_SERVER=http://<RASA_SERVER>:5005 -
com.kintana.core.server.RASA_MODEL_PATH=<Rasa_project_folder>/models<Rasa_project_folder>is the folder where your Rasa project is created. See Set up Rasa server.
-
- Start the PPM server.
Map Rasa server to web server
We recommend you not expose the Rasa Server to the outside world, but rather connect to it from your backend over a private connection.
You need a web server that supports https to map the Rasa server.
For example, map https://ppmbot.demo.com to http:<Rasa_Server>:5005.
Update bot messaging endpoint
Update the messaging endpoint of your bot. Remember to replace the Rasa server URL with the mapped web server URL.
For example, https://ppmbot.demo.com/webhooks/botframework/webhook.
Test and distribute bot
Go back to Teams App Studio, click Test and distribute in the Finish section. Click Install and add the bot to your teams.
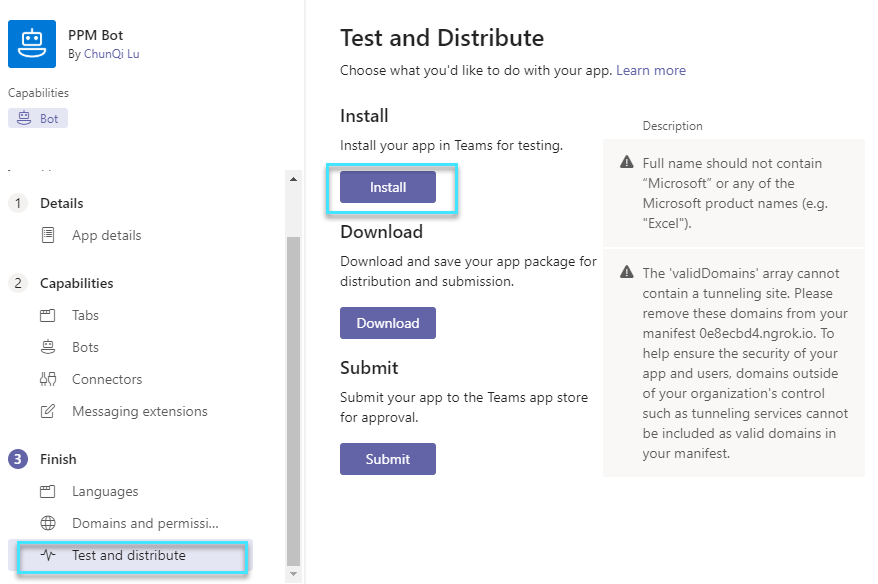
For details, see https://docs.microsoft.com/en-us/microsoftteams/platform/concepts/deploy-and-publish/overview.
(Optional) Customize welcome sentence
You can customize the welcome sentence that PPM Chatbot sends to the users in the welcome.html file from the <PPM home>/bin/chat/microfocus/ directory.