Share this page


View requests
This topic introduces the sections (tabs) in a request detail page.
Note: You can use the Use Tabs in Request Details Page feature toggle to control how the request details are displayed. If the Use Tabs in Request Details Page feature toggle is turned on, the request detail page displays the Dashboard, Details, Status, Notes, and References sections as tabs. If the feature toggle is turned off, the request detail page displays these sections in a long page.
Open a request
See Open a request.

Top section
The top of the request detail page displays the request number, the request type, and the available actions. The top section is visible after a request is created and submitted. The title of the request detail page is <Request Type><Request Number> - <Request Description>.
From the top section of the detail page, you can do the following:
-
Perform an available action
If you have the required permissions to perform the current workflow step on the request, the toolbar lists the actions you can take. Some actions, such as Accept and Reject, move the request to another step in the workflow. If you select an action such as Assign Resource or Delegate Decision, a workflow action page opens to present additional choices. Some actions change optional fields to required.
If the action you are taking on a request requires more information, a request "look-ahead" page opens. To complete the action, provide information in the required fields that are marked with a red asterisk. If you cannot provide all the information immediately, click Save on the look-ahead page to save the information you have provided.
Reference relationships let you place a request on hold until another request is completed. In these reference relationships, the available actions contains the Override button. To allow the request to proceed through the workflow, you click Override. When a relationship is overridden, the change is reflected in the References section.
Note: The number of workflow steps displayed on the toolbar depends on your screen resolution. To see more workflow steps, you can:
-
From the Control Panel, select a higher screen resolution
-
Maximize your browser
-
Press
ctrland-to zoom out your browser
-
-
Print the request details. See Print requests.
-
Save the request.
-
Make a copy of the request. See Copy a request.
-
Delete the request. See Delete requests.
-
Expand or collapse all sections on the page.
-
Jump to the Status section.
-
Go back to the top of the page.
When you scroll the page down, the Back to Top button appears to the left of the Save button. Clicking this button brings you to the very top of the page.
Details section (tab)
The Details section (tab) of a request detail page contains information specific to the request, including the request's general information such as who created the request, a description of the problem, the business area affected, and the resolution of the request.
The Details section (tab) is included in request creation and continues with the request until resolution. Typically, when creating a request, you must complete some of the fields in the details section. After a new request is submitted, you must update various fields as the request proceeds through the resolution process.
The details section contains several subsections, such as:
- The Problem/Resolution and Analysis subsections.
- The Resources subsection if resource tracking is enabled for the request. For details, see Resources section.
- All the custom subsections.
Notes section (tab)
The Notes section (tab) is included in the request creation process and continues with request until resolution.
The Notes section contains the following information:
| Information | Description |
|---|---|
| Notes added for the request |
The Notes section includes the following subsections:
|
| Request field value change history |
The notes section also includes the value change history for request fields that have the Notes History attribute set to Yes.
Limitation: If a table component field name contains the pipe character "|", the Notes section does not display the character for the table component field. |
Dashboard section (tab)
The Dashboard section (tab) of a request detail page is available when the Enable Request Dashboard toggle is turned on in the request type setting page. For details, see Configure dashboard for request types.
The Dashboard section (tab) lists a set of preconfigured portlets to collectively display request information.
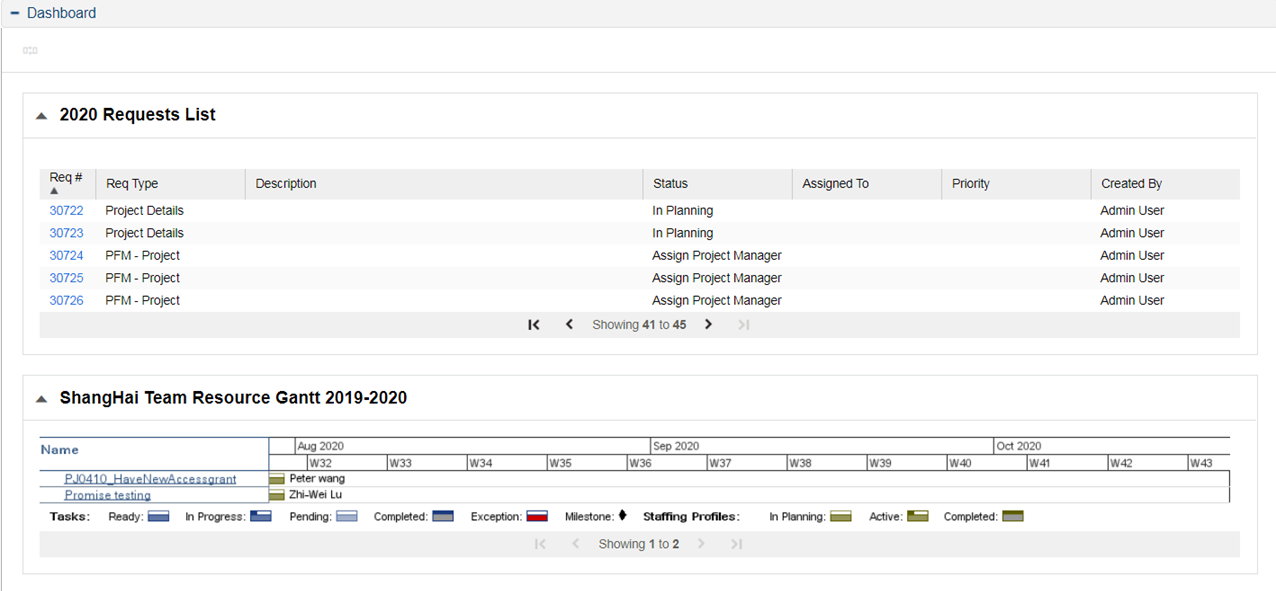
From the Dashboard section, you can:
-
Collectively view the request information.
-
Drill down on displayed data to view more details.
-
Export the portlet data.
Status section (tab)
The Status section (tab) of a request detail page lists the request's associated workflow steps, and provides details for the completed workflow steps.
View a request's associated workflow steps
The Status section (tab) lists the request's associated workflow steps in the hierarchical order.
Some workflows include subworkflows. Subworkflow steps are displayed sequentially with the other workflow steps, and are numbered with additional decimal numbers, corresponding to the workflow level, for example, 3.1, 3.2, and 3.3.
If a workflow step has been acted on, the status of the workflow step and the resource who completed the step are also listed. The active workflow step is highlighted.
View workflow step details
The Status section (tab) includes the following links for you to view more details of the request's associated workflow steps. These links are displayed at the bottom of the Status section.
| Link | Details |
|---|---|
| Graphical View
|
Opens the Graphical Workflow window, which displays a graphical representation of the workflow applied to the request. The graphical workflow shows which workflow steps have been visited and which workflow step is the current workflow step.
The Legend section describes the colors and symbols used to illustrate the workflow steps and transitions. To see a summary description of a workflow step, move your cursor over the step to view the tooltip text. Your administrator can assign a Current %Complete value to individual workflow steps. As the request moves along the workflow, the percent completed is updated according to the value configured for each step. |
| Approval Details |
Opens the Approval Details window, which displays a detailed view of approved active and completed workflow steps.
|
| Transaction Details |
Opens the Transaction Details window, which lists information for each completed workflow step transaction. |
References section (tab)
This section describes the References section (tab) of a request detail page.
Overview
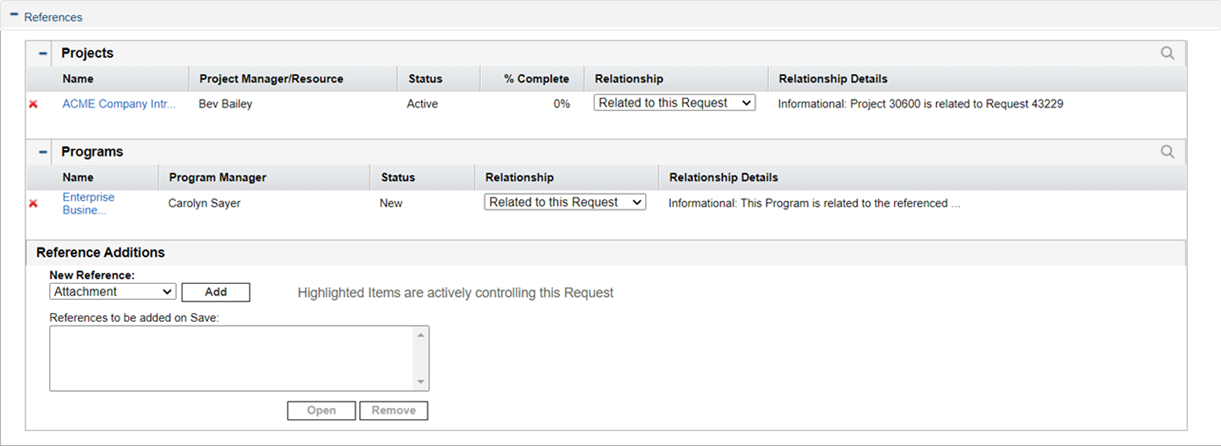
The References section (tab) of the request detail page contains additional information related to the request. For example, you can add a URL to a request or delete an outdated document from a request. The References section is included in the request creation process and remains through to request resolution. References can be added or deleted from the request.
Use the Reference Additions subsection to add references to the request. Saved references are organized based on reference type. For example, all saved reference packages are saved in the Packages section.
In some cases, you can create a functional dependency between a request and the referenced entity. For example, you can specify that a package is a predecessor to the request. This means the request cannot continue to the next workflow step until the package is closed. For a list of the references, their definitions, and possible dependency relationships, see References and relationships.
The following table lists the references, their definitions, and possible dependency relationships.
|
Reference |
Reference Description |
Possible Relationships |
Relationship Description |
|---|---|---|---|
|
Attachment |
Attach a file from a local machine to the current request. The attached file is copied to the server. |
Standard attachment interaction |
(Informational) The attachment is related to this request. |
|
Packages (Existing) |
Reference an existing package. |
Child of this request |
(Informational) The selected package is the child of the request. |
|
Related to this request |
(Informational) The selected package is related to the request. |
||
|
Predecessor |
(Blocking) Action is not allowed on the request until the referenced package closes. |
||
|
Successor |
(Blocking) Action is not allowed on the referenced package until the request closes. |
||
|
Packages (New) |
New packages can also be created from a request. If configured as part of the workflow, you can spawn a package from a workflow step. When this happens, a reference to that package is automatically generated, establishing a two-way link between the request and package. |
Child of this request |
(Informational) The selected package is the child of the request. |
|
Related to this request |
(Informational) The selected package is related to the request. |
||
|
Predecessor |
(Blocking) Action is not allowed on the request until the referenced package closes. |
||
|
Successor |
(Blocking) Action is not allowed on the referenced package until the request closes. |
||
|
Projects |
Reference a project in Project Management. |
Related to this request |
(Informational) Selected project is related to this request. |
|
Releases |
Reference a release in Deployment Management. |
Contains this package |
(Informational) The request is contained in the selected release. |
|
Requests (Existing) |
Reference an existing request. |
Duplicate request |
(Informational) The referenced request is a duplicate of the request. |
|
Original duplicate requests |
(Informational) The referenced request is the original of the two duplicate requests. |
||
|
Parent of this request |
(Informational) The referenced request is the parent of the request. |
||
|
Child of this request |
(Informational) The referenced request is the child of the request. |
||
|
Related to this request |
(Informational) Referenced request is related to this request. |
||
|
Predecessor |
(Blocking) Action not allowed on this request until the referenced request closes. |
||
|
Successor |
(Blocking) Action not allowed on the referenced request until this request closes. |
||
|
Requests (New) |
You can create new requests from an existing request. Also, if configured as part of the workflow, you can spawn a request from a request. A reference to that request is automatically generated, establishing a two-way link between the requests. |
Duplicate request |
(Informational) The referenced request is a duplicate of the request. |
|
Original duplicate requests |
(Informational) The referenced request is the original of the two duplicate requests. |
||
|
Parent of this request |
(Informational) The referenced request is the parent of the request. |
||
|
Child of this request |
(Informational) The referenced request is the child of the request. |
||
|
Related to this request |
(Informational) Referenced request is related to this request. |
||
|
Predecessor |
(Blocking) Action not allowed on this request until the referenced request closes. |
||
|
Successor |
(Blocking) Action not allowed on the referenced request until this request closes. |
||
|
Tasks |
Reference a task in Project Management. |
Related to this request |
(Informational) The referenced task is related to this request. |
|
URL |
Reference a Web address. Documents at the URL must be in MIME format. |
Standard URL interaction |
(Informational) The URL is related to this request. |
Descriptions of relationships
The following table describes the various relationships:
| Relationship | Description |
|---|---|
|
Predecessor relationships dictate that an action cannot be performed on one entity until the referenced entity closes. For example, an action is not allowed on a request until the referenced package closes. After the package closes, users can again act on the request. (This does not prevent users from editing other request fields.) |
|
|
Successor relationships dictate that action is not allowed on a referenced entity until the entity closes. For example, users cannot perform an action on a referenced package until the request closes. The package status is Pending Request. After the request closes, users can act on the package again. This does not prevent users from modifying other task fields. |
|
|
Finish/Finish, or FF, predecessor relationships dictate that the two entities complete at the same time. For example, a referenced package cannot have a status of Complete until the original request is closed. After the resource working on the original request is finished, and the status is set to Completed (% Complete is set to 100%), the referenced package acquires Completed (Pending Request) status.After the request is closed, the referenced package is set to Completed. (This does not prevent users from editing other request fields.) |
Search and download references
You can search for a reference by text strings contained in the target reference subsection.
To search and download references:
-
Locate the target reference subsection and click the Search icon at the top right.
Note: If you are in the Program Details page: References tab or the Package Details page, you can find the Search icon at the top right of the References section. You can use this Search box to search for references of all types.
-
Type a text string in the Search box. The reference that has the text string contained in the subsection will filter itself out.
You can download a single attachment or all the attachments as a zip file:
-
To download a single attachment, click the name of the attachment you want to download. The attachment is downloaded automatically.
-
To download all the attachments of a request, click Download All. All of the attachments added to the request are downloaded as a Zip file.
Strategy section (tab)
The Strategy section (tab) is available in request details page when:
- The request is added in a portfolio, and
- The portfolio either has strategic themes defined or has business goals related to KPIs.
Align the request with strategic themes
When a request is added to a portfolio, the portfolio's strategic themes are passed down to the request, you can align the request with the one of the portfolio's strategic themes. If a request is added to more than one portfolio, you can align the request to each of these portfolio's strategic themes, one strategic theme per portfolio. by filling the Strategic Theme field in each portfolio section.
To align the request with one or more strategic themes:
-
In the Strategy section, locate a portfolio from which you want the request to inherit one of its strategic themes.
-
In the Strategic Theme field, select one strategic theme for the request, so that the request inherits the strategic theme that is used by the portfolio. This links the request with the portfolio in terms of business value.
-
Repeat these steps if you want to align the request with another portfolio's strategic theme.
Which KPI is a request's relative KPI depends on whether the request is aligned to a strategic theme, as described in the table below:
| Scenario | Which KPI is picked |
|---|---|
| If the request is aligned to a portfolio strategic theme |
PPM picks the KPIs related to the business goals that serve the portfolio strategic theme as the relative KPIs, assuming these KPIs have the strongest correlation with the request. In case the portfolio strategic theme with which the request is aligned does not have related KPIs, PPM picks the KPIs related to the portfolio's other strategic themes as relevant KPIs. You should then decide which irrelevant KPIs can be ignored. |
| If the request is not aligned to a portfolio strategic theme | PPM picks the KPIs related to all the portfolio's business goals as relative KPIs. You should then decide which irrelevant KPIs can be ignored. |
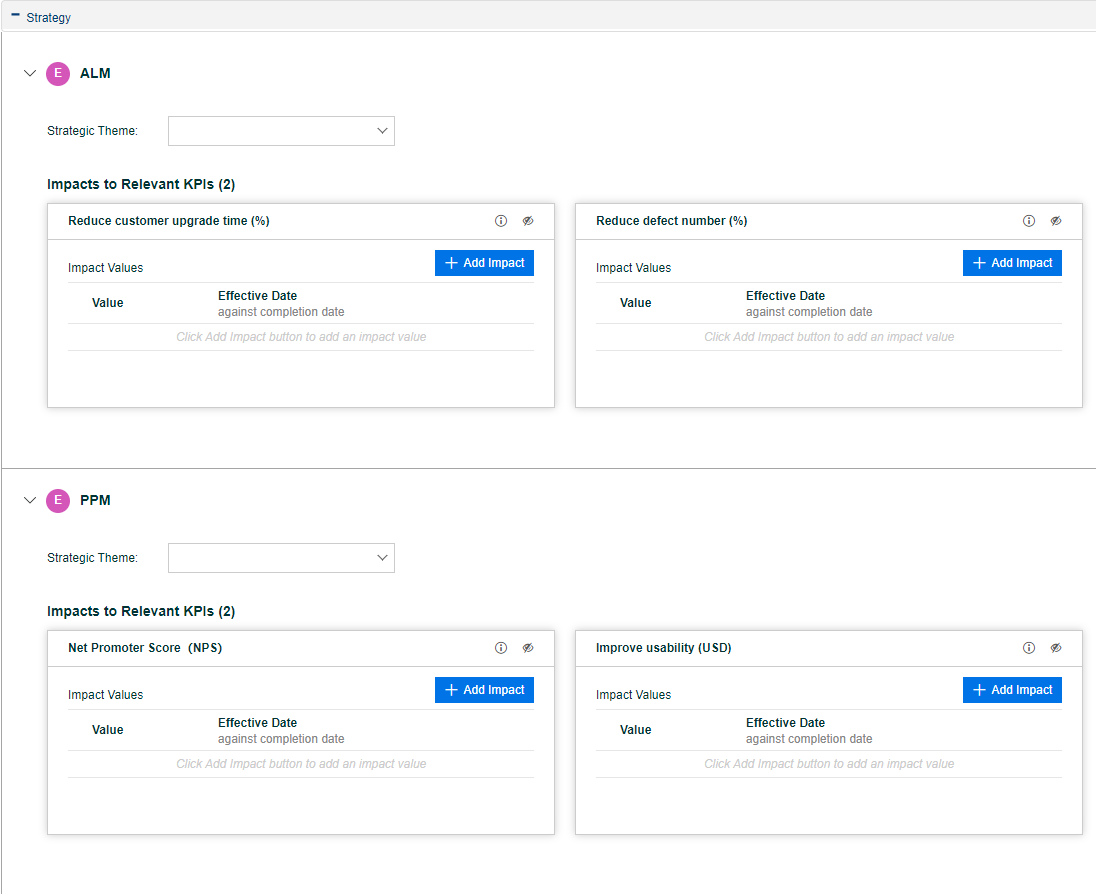
Add request's impacts to a KPI
If you find a KPI is relevant to your request, you can enter impacts (forecast how much value your request produces) to the KPIs.
To add a KPI impact:
-
Locate the KPI, and click Add Impact.
-
Enter the impact value and the effective date of that value.
Example: If you add an impact for the KPI "revenue growth", the impact value is 3%, and the effective date of Oct. 31, 2018, it implies that the request will probably produce a 3% increase in revenue by the effective date.
-
Save the impact.
Ignore and un-ignore irrelevant KPIs
If you find a KPI not relevant to your request, you can ignore the KPI. To ignore a KPI, click the Ignore button in the KPI. The KPI is moved to the Ignored KPIs list.
If you later find the KPI relevant, un-ignore the KPI by clicking the Un-ignore icon. The KPI is moved back to the relevant KPIs list.
Resources section
If your PPM administrator has enabled resource tracking for the request type, the request detail page displays the Resources section under the Details section (tab).

The Resource column in this section lists the resources assigned to the request so far. The section may also include Scheduled Effort, Actual Effort, Actual Start, and Actual Finish columns.
You can perform the following actions in the Resources section:
| Action | Details |
|---|---|
| See resources assigned to a request |
Every time you use the Assigned To field of a request to assign resource to the request, that resource is automatically added to the Resources section and listed on the request. The Resources section lists the resources that were previously assigned and are currently assigned, their contributed effort, and the time when the effort is contributed. |
| Add resources |
If you are authorized to manage the Resources section, you can use the Add Resource button to select and add resoruces to the list. |
| Change allocations for listed resources |
If you have the required permissions, you can use the Scheduled Effort (hrs) field to change allocations for the listed resources. Note:
|
| Update actuals |
You can use the Actual Effort,Actual Start, and Actual Finish fields to update your actual effort on the request. Note:
|
 See also: