Share this page


Add positions
This topic describes how to add positions to a staffing profile.
Add positions in the New UI
To add a position in the New UI of the Staffing Profile page, you can:
- Add a new position, or
- Add a position by copying an existing position from the current staffing profile
Add a new position
-
Click the Add Position icon
 .
.A table entry is added on the top of the table.
-
Complete the required and optional columns for the position.
The Position and Role columns are always required.
Column
(*Required)Description Position The name of the position.
If you specify a role for the position in the Role field, the Position field is pre-populated with the role name, otherwise, the Position field is empty.
Role* The role needed to fill the position. Click the Role icon to specify a role. Other columns displayed by default and required are respectively controlled by the STAFFING_PROFILE_DEFAULT_COLUMN and STAFFING_PROFILE_REQUIRED_COLUMNS parameters. You can also add columns as described in Add and remove columns on Staffing Profile page.
See Position properties for the descriptions for these columns.
-
Create the forecast demand of the position.
For details of creating position's forecast demand, see Configure Gantt chart on Staffing Profile page.
- In the right-corner of the position list, click
 . The position is added.
Add a position by copying an existing position
- Select the check box before the position you want to copy.
-
Above the allocation table, click
 .
.The copied position is added to the top of the allocation table.
-
Select the copied position, and then edit the Position, Role, and Resource Pool fields and its planned assignments.
To adjust the position's forecast demand, see Adjust position's forecast demand.
- Click to save the changes.

Add positions in the Legacy UI
To add positions in the Legacy UI of the Staffing Profile page:
-
Click Add a Position.
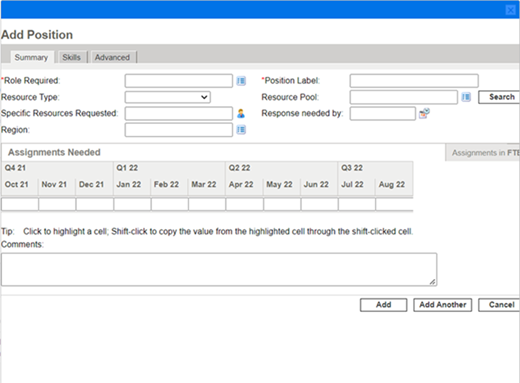
-
Specify a Role Required and Position Label for the staffing profile line (required). Provide data for any optional fields such as the assignments needed for each time period.
Description
Role Required
The role needed to fill the position.
Position Label
The name of the position.
Resource Type
The type of resource needed.
Resource Pool
The resource pool from which to assign the role. Click Search to find a resource pool.
Note: If you click Search on the right of the Resource Pool field in the Add Position dialog box to search resource pools, the search result lists all the resource pools that fit the search criteria, regardless of whether you have the view access grant to all of them.
The name of a specific resource to fill the position. The resource request will include the name of the specified resource. However, the resource pool manager may select other resources to allocate.
When you choose a specific resource requested, PPM automatically fills the Position and Role columns with the resource's role, and the Resource Pool column with the resource pool where the resource belongs to.
- If you already filled the Position or Role column before specifying a specific resource, you are asked whether you want to override the previously filled position or role.
- If a resource has allocations in different resource pools in different periods, PPM lists all these resource pools for you to select one to fill the Resource Pool column. However, if the parameter IGNORE_POOLS_WITH_ONLY_PAST_RESOURCE_PARTICIPATION is set to
true, PPM lists only the resource pools that have the resource's allocations in the future.
Response Needed By
The date when the position should be filled.
Region The region of the position.
Assignments Needed
The amount of FTEs or hours needed to fill the position. To save time, you can highlight a cell by clicking it and then using Shift + click to fill a range of other cells in the same row with the value it contains.
Comments
Any notes you want to include about the position.
-
Optionally, you can assign skills to the position. To assign skills to a position, follow these steps:
-
Click the Skill tab, and then click Add a Skill.
A skill line pops up for you to select the Skill field, and specify the Aptitude field.
The Aptitude field specifies the minimum skill proficiency that the resource must meet.
-
Select the skill in the auto-complete list, and then specify the aptitude in the drop-down list.
After you select the skill, the category of the skill will be displayed in the Category field if it is specified.
You can click the
 icon to remove a previously-added skill.
Figure 4-5 Skills tab of a position profile
-
-
Optionally, under the Advanced tab, set the cost category and expense type for the position.
The cost category is used to categorize costs of unmet demand. When the project associated with the staffing profile is set to calculate the forecasted labor costs from the staffing profile, the Cost Category field is required.
The expense type is used to categorize capital and operating expenses. Only when SOP 98-1 tracking is enabled on the parent entity of the staffing profile, you can edit the expense type.
Note: You can configure the parameter DEFAULT_EXPENSE_TYPE_FOR_POSITIONS in the
server.conffile or Administration Console to decide the default value of the expense type. For details, see Server parameters.For information about financial summary settings and SOP 98-1 tracking, see the Financial Management User’s Guide .
-
Click Add.
The Staffing Profile page reloads with the staffing profile line added.
-
Repeat these steps to add more positions.
You can add more than one line to the staffing profile at a time without returning to the Staffing Profile page by clicking Add Another once you have filled in the values for one line.
 See also: