Share this page


Managing Work Items in a Time Sheet
Work items are what you have been working. This section details on how to add, delete, and group work items in your time sheet.
Adding Work Items to a Time Sheet
Add what you have been working on into your time sheet.
- Open your time sheet.
-
Click Add Items.
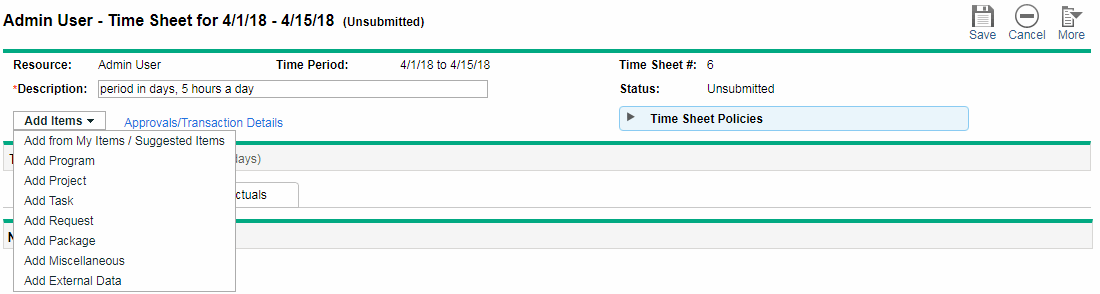
Option Description Add from My Items/Suggested Items Add work items from the My Items list or the Suggested Items list.
The Suggested Items list is automatically generated by Time Management for your convenience. The My Items list is a personal list of items you build and maintain, and its items are retained until you delete them.
For details, see Using the My Items List and Using the Suggested Items List.
Add Programs Available only when the time sheet policy allows logging time against programs.
This option allows you to add programs that:
-
Track time at the program level, and
-
Allow you to log time against them.
Add Project Available only when the time sheet policy allows logging time against projects.
This option allows you to add projects that:
-
Track time at the project level, and
-
Allow you to log time against them
Add Task Available only when the time sheet policy allows logging time against tasks.
This option allows you to add tasks that:
-
Track time at the task (or a specific summary task) level, and
-
Allow you to log time against them.
Since PPM 9.53, to use PPM to log your effort on agile work, you can add external tasks that are tracked in agile systems to your time sheets.
Add Request Available only when the time sheet policy allows logging time against requests.
This option allows you to add the requests for which you are allowed to log time.
Add Package Available only when the time sheet policy allows logging time against packages.
Add Miscellaneous Available only when the time sheet policy allows logging time against miscellaneous items.
Add External Data Available only when the time sheet policy allows logging time against external data.
External data is the effort you logged in the agile projects that are managed in agile systems. To add external data is to import such effort from the agile systems to the PPM time sheets.
For details, see:
-
-
Click Save to save the time sheet.
Note: If you add a large number of work items, you can use the  icon to decide the vertical size of the time sheet table.
This icon is only available when your administrator has set the TM_ENABLE_GRID_SIZE_CONTROL server.conf parameter to true.
Selecting the Medium or Large option of this icon allows you to see more time sheet lines on your screen without scrolling the table, as well as less white space below the table.
Deleting Work Items
- Select the work items you want to delete.
- Click Remove.
- Click Save.
Grouping or Ungrouping Work Items
The Group | Ungroup Items option in the time sheet allows you to show work items with or without headings (in bold) that represent logical groupings.
| When items are grouped |
The time sheet adds rows for headings (in bold) that group similar work items. No data can be entered in these heading rows, but each heading has a check box, and selecting it selects all of the subordinate work items. The headings appear in the following order, with subordinate work items, as follows:
|
| When items are ungrouped |
The items are listed in the following order, without heading lines such as project names and request types:
|