Share this page


Create staffing profiles
This topic describes how to create staffing profiles.
Create a staffing profile
This section provides details on how to create a staffing profile.
To create a staffing profile:
-
Log on to PPM.
-
Select Create > Staffing Profile from the menu bar.
-
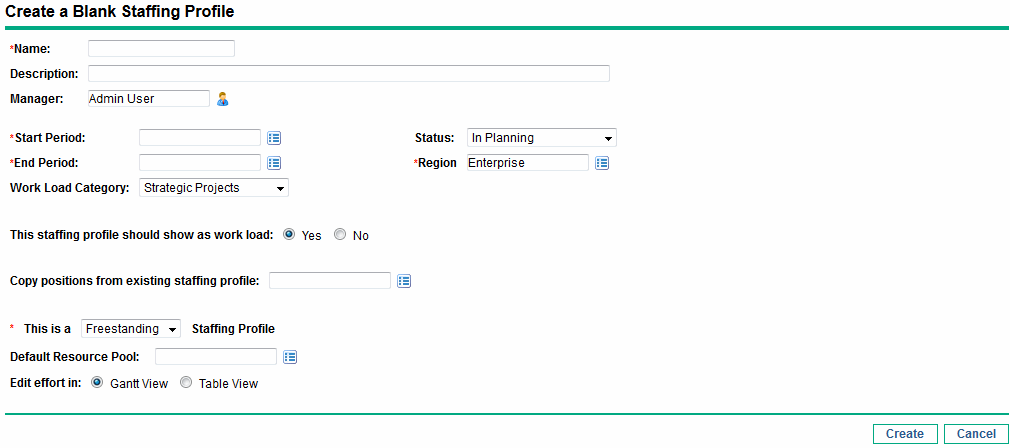
In the Create a Blank Staffing Profile page, provide data for all required fields and any optional fields.
Field Name
Description
Name
The name of the staffing profile.
Description
A description of the staffing profile.
Manager
The user responsible for the staffing profile
Start Period
The starting period (a fiscal month) for the staffing profile.
End Period
The ending period (a fiscal month) for the staffing profile.
Status
The status of the staffing profile.
-
In Planning. The staffing profile is being developed.
-
Active. The staffing profile is available to run.
-
Complete. The staffing profile has completed execution.
-
Cancelled. The staffing profile has been cancelled.
-
Lock Down. The staffing profile has been locked and is read-only (cannot be updated).
Region
The geographic region in which the staffing profile is used. The region determines the holiday schedule.
Work Load Category
The category of work being tracked by the staffing profile.
This staffing profile should show as work load
If selected, the Full Time Equivalents set in the staffing profile will be counted as actual work assignments in the Resource Management Analyze Assignment Load capacity visualization.
Copy positions from existing staffing profile
Copies the positions from the staffing profile selected using the auto-complete.
This is a __ Staffing Profile
Defines whether the staffing profile is freestanding, or is associated with an asset, org unit, or proposal.
To create a staffing profile for a project, you should go to the Project Overview page. For details, see Creating a Staffing Profile for a Project.
Default Resource Pool
When adding a line to the staffing profile, the Resource Pool field will be automatically defaulted with this value.
At this point, you should decide the following:
-
Whether lines in the staffing profile count as workload
-
Whether to copy positions from an existing staffing profile, and if so, which one
-
Whether the staffing profile is linked to an organization unit, asset, project, or proposal
-
Whether the staffing profile will request resources from a particular resource pool by default, and if so, which one
-
-
Click Create.
The Staffing Profile page (the New UI) opens.
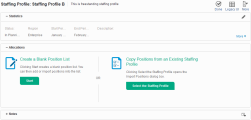
Note: Clicking Legacy UI, you can switch to the legacy UI of the Staffing Profile page. For details, see Staffing profile legacy UI.
-
Create a blank position list or copy positions from an existing staffing profile.
- Click Start in the Create a Blank Position List option to create a staffing profile with no positions.
- Click Select the Staffing Profile in the Copy Positions from an Existing Staffing Profile option to open the Import Positions dialog box. Using this dialog box, you can create a staffing profile with positions imported from other staffing profiles. For details of importing positions, see Import positions into a staffing profile.


Create a staffing profile for a project
This section provides the details on how to a staffing profile for a project.
To create a staffing profile for a project:
- Log on to PPM.
- From the menu bar, select Search > Projects.
- Provide the search criteria and click Search.
- Open the project for which you want to create a staffing profile.
-
In the Staffing portlet of the Project Overview page, click Create a Blank Staffing Profile.
- In the Create a Blank Staffing Profile page, provide or edit the values in the required or optional fields.
- (Optionally) If you want to create a staffing profile with positions copied from another staffing profile, from the Copy positions from existing staffing profile auto-complete list, select an existing staffing profile.
-
Click Create.
The newly create staffing profile is displayed under Staffing tab of the Project Overview page.
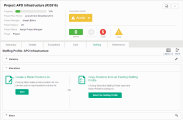
Note: Clicking Legacy UI, you leave the Project Overview page, and go to the Legacy UI of the Staffing Profile page.
-
If you skip step 7, do one of the following in the Allocations section:
- Click Start in the Create a Blank Position List option to create a staffing profile with no positions.
- Click Select the Staffing Profile in the Copy Positions from an Existing Staffing Profile option to open the Import Positions dialog box. Using this dialog box, you can create a staffing profile with positions imported from other staffing profiles. For details of importing positions, see Import positions into a staffing profile.

Note: You can view and edit the staffing profile information in the Staffing tab as you do in the Staffing Profile page. The actions listed in the More menus of the Staffing Profile page are not supported in the Staffing tab of the Project Overview page.
 Next steps: